|
|
 Loop Detector Loop Detector |
|
|
|
|
|
|
|
|
Ultrasonic Radar |
|
|
|
|
|
| |
Microwave Sensor |
|
|
|
|
| |
Safety Beam Sensor |
|
|
|
|
|
|
|
|
|
|
|
|
|
|
Optical Beam Sensor |
| |
|
| |
Door Switches |
|
|
|
|
| |
Automatic Barriers |
|
|
|
|
GSM Remote Opener |
|
|
|
|
 |
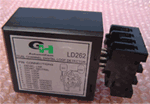
| LD260 2-Channel Vehicle Loop Detector |
| Specification: |
 •
Power Supply: 220VAC/120VAC/12VDC •
Power Supply: 220VAC/120VAC/12VDC
• Current: <50mA
• Detect time: <25ms
• Sensitivity: Eight levels
• Output: Relay 1 and 2, capacitor 110VAC/3A, 24VDC/5A
current
• Indicator: One red LED indicator for power and two green
LED indicator for channel detection
• Dimension: L76W42H74mm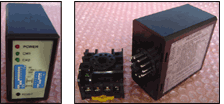
• Weight: 330g
• Connector: PF113A
• Frequency: 20-80KHz +
• Operation: Temperature
-40~85 ℃ Humidity 5%~95% |
| |
| Connectors: Please refer to the input power, loop
connectors and output connectors |
| |
Type |
| Pin |
LD261 |
LD262 |
LD263 |
LD264 |
| 1 |
110 V |
220 V |
12 V |
24 V |
| 2 |
110 V |
220 V |
12 V |
24 V |
| 3 |
CH1 Loop |
| 4 |
Ch1 Loop |
| 5 |
CH2 Loop |
| 6 |
CH2 Loop |
| 7 |
CH1 Relay Output N.O.(default) (1.2 short cut in
JUMP PIN1 inside the detector)/ N.C.(2,3 short cut in JUMP PIN1
inside the detector) |
| 8 |
CH1 Relay Output N.O.(default) (1.2 short cut in
JUMP PIN1 inside the detector)/ N.C.(2,3 short cut in JUMP PIN1
inside the detector) |
| 9 |
Ground |
| 10 |
CH2 Relay Output N.O.(default) (1.2 short cut in
JUMP PIN2 inside the detector)/ N.C.(2,3 short cut in JUMP PIN2
inside the detector) |
| 11 |
CH2 Relay Output N.O.(default) (1.2 short cut in
JUMP PIN2 inside the detector)/ N.C.(2,3 short cut in JUMP PIN2
inside the detector) |
|  |
|
| |
| Operation Panel and Switches: |
• 1. POWER LED: Red LED Indicator. If it is in full lit,
power is supplied.
• 2. CH1 LED: Green LED Indicator. If it
is in full lit, a vehicle on Loop 1 is detected. If it is blink,
the Loop 1 is wrong.
• 3.CH2 LED: Green LED Indicator. If it
is in full lit, a vehicle on Loop 2 is detected. If it is blink,
the Loop 2 is wrong.
• 4.SW1: CH1 LOOP Function Selection
(1) DIP 1 Special Sensitivity Increase For Trailer(Both Channels).
| DIP NO. |
DIP MODE |
Function |
| DIP 1 | □■ ON |
Increase sensitivity for both channel to avoid unwilling relay OFF for
leaving vehicle especially for trailer |
(2) DIP 2 Automatic Reset(Both Channels)
| DIP NO.
|
DIP 2 |
Present Modes |
| DIP MODE
|
□■ ON | Vehicle can be permanent present.
(no auto-reset, unless vehicle left or manual reset)
|
| DIP MODE
|
OFF ■□ |
Normal mode. (automatic reset after 10 minutes present of
vehicle, used to solve the mistake operation. It is recommended) |
(3) DIP 3 Direction Detection(Both Channels)
| DIP NO.
|
DIP 3 |
Detection Mode |
| DIP MODE
|
□■ ON | Direction Detection->(If vehicle is
from CH1 to CH2, then CH1 Relay output; if vehicle is from CH2 to CH1, then
CH2 relay output. |
| DIP MODE
|
OFF ■□ |
Normal mode, two loop detections are separated |
(4) DIP 4 CH1 Relay Output Types
| DIP NO. |
DIP 4 |
CH1 Relay Output Types |
CH1 Vehicle Present  |
| DIP MODE |
OFF ■□ |
CH1 relay will be present output |
CH1 Relay Output  |
| DIP MODE |
□■ ON |
CH1 relay output type is pulse for 600ms |
CH1 Relay Output  |
(5) DIP 5 CH1 Relay Pulse Output Types
| DIP NO. |
DIP 5 |
CH1Relay Pulse Types |
CH1 Vehicle Present  |
| DIP MODE |
OFF ■□ |
When vehicle going into, CH1 relay is in pulse output for
200ms |
CH1 Relay Output  |
| DIP MODE |
□■ ON |
When vehicle left loop, CH1 relay will delay 200ms and
give a pulse output for 600m |
CH1 Relay Output |
(6) DIP 6 & DIP 7 & DIP 8 CH1 Sensitivity Selection. Eight Level
Choices
| DIP NO. |
DIP 6 |
DIP 7 |
DIP 8 |
Sensitivity (%) |
| DIP MODE | □■ON | □■ON |
□■ON | 0.015 |
| DIP MODE | □■ON | □■ON | OFF■□ | 0.02 |
| DIP MODE | □■ON | OFF■□ |
□■ON | 0.04 |
| DIP MODE | □■ON | OFF■□ | OFF■□ | 0.08 |
| DIP MODE | OFF■□ | □■ON |
□■ON | 0.12 |
| DIP MODE | OFF■□ | □■ON | OFF■□ | 0.2 |
| DIP MODE | OFF■□ | OFF■□ |
□■ON | 0.5 |
| DIP MODE | OFF■□ | OFF■□ | OFF■□ | 0.8 |
(7) DIP 9 & DIP 10 Frequency (30K~100KHZ). Used to avoid
the interference
| DIP NO. |
DIP 9 |
DIP 10 |
Frequency |
| DIP MODE |
OFF ■□ |
OFF ■□ |
High(Hi) |
| DIP MODE |
□■ ON |
OFF ■□ |
Medium-High(Med-Hi) |
| DIP MODE |
OFF ■□ |
□■ ON |
Medium-Low(Med-Low) |
| DIP MODE |
□■ ON |
□■ ON |
Low(Low) |
• 5.SW2: CH2 LOOP Function Selection
a ) DIP 1
CH2 Relay Output Type Selection: Same as CH1 SW1-DIP4
b ) DIP 2 CH2 Relay Pulse Output Type Selection:
Same as CH1 SW1-DIP5
c ) DIP 3 & DIP 4 & DIP 5 CH2 Sensitivity Selection:
Same as CH1 SW1-DIP 6 & DIP 7 & DIP 8
d ) DIP 6 & DIP 7 CH2 Frequency Selection: Same as
CH1 SW1-DIP 9 & DIP 10
In the application of many loops which are nearby, the frequency may
require be changed to avoid interference.
• 6.RESET Button: Press the RESET button will reset the
detector. Reset is normally used after any DIP change and
installation. |
| |
| Installation and Diagnoses: |
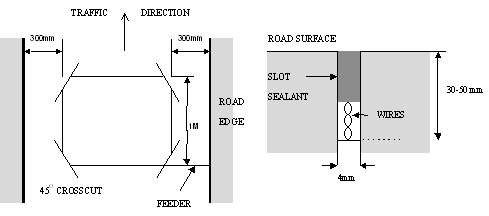 |
• 1. Please refer the upside diagrams for loop size and
installation
• 2. We recommend to use 0.75mm2 multi-core copper wire. The
total wire length include feeder can be up to 500m.
• 3. The loop should be rectangular and avoid any right
angle. The recommended length is from 1.0m-2.0m, the recommended
width is from 0.8m-1.2m.
• 4. The perimeter and no. of turns:
| Perimeter |
No. of Turns |
| 3 - 4 m | 6 |
| 4 - 6 M | 5 |
| 6 - 10 m | 4 |
| 10 - 20 m | 3 |
| 20 m – up | 2 |
• 5. The feeder must be twisted once per 15mm.
• 6. More turns, lower frequency. Less turns, higher
frequency.
• 7. Place the loop away from the moving metal.
• 8. Any vehicle can be detected, when the speed is less
than 160km/h
• 9. Relay capacity, 110VAC/3A, 24VDC/5A.
• 10. If the detector is not working, please check as
following
a ) Press RESET.
b ) If red LED indicator is not in full lit, please
check power supplier.
c ) If one or two green LED indicators blink, it may
be: the relative loop is short cut or no. of turns is not
enough(blink slowly); the relative loop is open or no. of turns
is too many(blink fast).
d ) No. of turns is not enough: change the frequency
to lower. If frequency is still too high, you must add more
turns.
e ) No. of turns is too many: change the frequency to
higher. If frequency is still too low, you must leave some
turns. Only both loop is properly connected and not blink, then
the detector is working |
| |
| |
